Your #1 Tech Website Resource for your IT Certification! Daily Technology News, Tutorial and More!
We’re dedicated to giving you the very best of It Cert, with a focus also on Cisco/huawei certs, security and IoT and Lab
VISIT MY WEBSITE:
https://www.techguruhub.net
The best approaches for Python documentation authoring
Get link
Facebook
X
Pinterest
Email
Other Apps
Have you ever experienced frustration because of the code you wrote? If you have been writing code for a while now, you probably had. And, if not, you certainly will. Sometimes we just keep staring at the code, trying to figure out what it does and why. When we wrote the code, everything was clear, but after a few weeks or months, it looks fuzzy. We can prevent this bad situation simply by writing Python Documentation. In this article, we are going to see how you can use python documentation best practices. These will make your code far more readable and maintainable.
Python Documentation Manifesto
What does “documenting” mean?
Documenting means add information to your code for other programmers to read. If you took coding classes, someone probably told you that writing code means talking to the PC. If you believe that, think again, because computers only understand binary: 0 and 1.
You write code for people to read, not for computers.
Let this statement sink in your brain, as this can change the way you work. Even more, it can turn you from beginner to professional in no time, saving you all the pain in the road. You write code for people to read. It doesn’t matter if some other programmers will read your code, or if you are the only one working on it. At some point in time, you will have to read the code again. Thus, even if you are working alone, make a favor to the “you of the future”.
Documenting means adding an explanation to your code.
So, documenting means adding an explanation to your code. The program won’t use that for its functionality, but other programmers will use that to get by. Your should document every piece of code, even the ones you think obvious. Nothing is obvious when it comes to programming.
Python Documentation according to Best Practices about The best approaches for Python documentation authoring
Every programming language supports documentation. Furthermore, every programming language has its own best practices when it comes to documentation. Python makes no exception, and we have some rules to follow when writing python documentation. In fact, the official Python website throws at you a list of things to do in this document. Probably not the easiest way to start writing documentation.
The most crucial principle you need to remember is that code and documentation must be in the same location. Writing the code and then writing a PDF paper to demonstrate its functionality is a horrible idea. Even more, it is one of the worst ideas we could have. By doing so, I ensure that one day someone will alter the code and neglect to update the document. This will create a gap between code and documentation that will gradually expand to render documentation ineffective.
Code and documentation must live in the same location.
This is a modern idea of documentation, and many languages are embracing it. It simply means you write the documentation in the same file as the code. To be even more detailed, you write the documentation within the code you wish to document. Documenting a function? Write its documentation within the def statement. Documenting a class? Write the documentation within the class statement, you get the point.
As we shall see, Python does a pretty fantastic job at that. Writing Python Documentation within the code is very straightforward.
Simply put, the docstring is a string containing the documentation of a given component. It is a special multiline string, thus you have to include it between three sets of quotes, not just one. Each individual component (a function, a class, a module) has its own docstring. If you don’t specify it, it will be None. Each component can have only one docstring.
The docstring is a string containing the documentation of a given component.
Writing a docstring is simple, you just add the multiline string syntax right after the definition statement. No blank lines before, no blank lines after. Take a look at the following code, it shows you how to write the docstring in any circumstance.
"""This is the module docstring, as it is at the beginning of the file"""
class SampleClass:
"""This is the docstring for SampleClass"""
defsample_method(self):
"""This is the docstring for sample_method"""
pass
def sample_function:
"""This is the docstring of sample_function"""
pass
Dead simple. The docstring is not a comment, it is a string that the interpret will process. Furthermore, you can access the docstring with the __doc__ special attribute. If you want to print the documentation for SampleClass, you could print SampleClass.__doc__. If you want the one of sample_method, print SampleClass.sample_method.__doc__.
What to write inside a docstring
Writing Python documentation is extremely easy. However, writing meaningful python documentation requires more attention. You need to know what to write and what not to write.
Ideally, a docstring should explain what the function, class, or module does. It should not explain the way it works inside, but only how you can use the component from the outside. By reading the docstring, you should know how to use the function, class, or module it explains. You shouldn’t worry about how it works, only about how you can use it. Look at the following code.
defmultiply(a, b):
"""Multiplies two numbers"""
return a * b
We can change the code inside the function to perform a sequence of additions, rather than a simple multiplication. Nonetheless, the output will be the same, and so does the input. Thus, the docstring is still valid if we rewrite the function as below.
defmultiply(a, b):
"""Multiplies two integers"""
if a == 0or b == 0:
return0
res = 0
for i inrange(b):
res += a
return res
Now, it is true that this function will not work if b is negative, but we don’t care here. It is simply to show that docstring is useful when working outside the function.
Multiline Docstrings
Some components do serious stuff. They might perform advanced calculations, handle complex objects, and so on. For this kind of function, you might want to write a longer docstring. Not a problem, docstrings are natively multiline. However, you should write an overall description on a single line, leave a blank line, and then a more complex description.
defmultiply(a, b):
"""Multiplies two integers
The first number does not have constraints, but the second number
cannot be negative. Doing otherwise leads to unexpected behaviour."""
if a == 0or b == 0:
return0
res = 0
for i inrange(b):
res += a
return res
More often than not, you will be writing multiline docstring. We will see why in a minute.
What about comments?
We added comments in the Learn Python for Beginners in a Day crash course. Basically, if you type # on a line, Python will disregard anything after that. Comments are not docstrings when it comes to Python documentation. They each serve a distinct purpose.
A remark should never be more than one line long and should clarify what the code is doing. When it comes to describing the code within a function, comments are your greatest friend.
Docstrings are for those who will be utilizing your component. Components are used by those who are altering the code base.
Never use a comment when a docstring would suffice, and never use a docstring when a comment would suffice. This is a golden guideline that will assist you in growing your code in a manageable manner. Docstrings are for individuals who will use your component, whereas comments are for those who will be altering its code base.
defmultiply(a, b):
"""Multiplies two integers
The first number does not have constraints, but the second number
cannot be negative.Doing otherwise leads to unexpected behaviour."""
# If any of the numbers is zero, result will be zero
if a == 0or b == 0:
return0
# Define a variable to store the result temporarily
Who said your docstrings had to be boring? They certainly shouldn't! In reality, you should use the reStructured Text (RST) syntax. RST is a method of producing text documents that can be parsed into something more graphical while being readable as text documents.
RST is a plain-text document syntax that adds embellishments when read by a RST reader. You may, however, read it as plain text.
For example, in RST, you can write *text* to make the text bold. This doesn’t make your text ugly like adding HTML tags but allows it to be translated into beautiful HTML with a reader. You can read here about all the manipulations RST can do for you. If you are in a hurry (and who isn’t?), however, we reported the crucial parts right below.
RST Syntax for people in a hurry
Python documentation heavily relies on RST. This doesn’t mean you have to know it all, but knowing some is certainly good. This is what you will be adding all the time to your docstrings.
*text* makes the text bold.
**text** makes the text italic.
You can combine the two above in ***text***, which results in bold and italic.
You can also add an underline to your text with =, * and - to make the text look like a title. Optionally, you can add also the same line above the text, the effect won’t change. However, the underline should be as long as the text, or even longer.
Heading
=======
Subheading
**********
Even smaller heading
--------------------
You can also use the special syntax :func: to reference a function (or method), :class: to reference a class and :mod: to reference a module. After that, write the component name between special quotes as in the example below. When an RST parser will build the text, it will create a link to the component you are referencing. Much better than writing just the component name.
:mod:`mymodule`
:class:`mymodule.MyClass`
:func:`mymodule.MyClass.my_method`
:func:`mymodule.my_function`
Sometimes, things can look really ugly if you have a long dependency tree like mysupermodule.mysubmodule.MyClass.my_method. Showing all of that is cumbersome, for no reason. We can avoid that with ~: adding this symbol at the beginning of the reference will show only the last item. For example, :func:`~mysupermodule.mysubmodule.MyClass.my_method` will render simply as my_method. Of course, the link will still point to the correct position.
Python Documentation of Parameters, Returns, and Errors
We know that at the core of Python Documentation we have the docstring. We also know that we should use it to explain how to use our function, module, or class. When talking about functions and methods, it makes sense to explain which parameters we expect and which returns we will give. Furthermore, if the function may generate an error, we want to tell which error may be raised and under which circumstances.
To do all of that, we use the special keywords :param:, :type:, :return:, :rtype:, and :raises:. Specifically, we use them in this way.
:param parameter_name: description allows you to define a description of the parameter.
:type parameter_name: description allows you to define a description for the type of value expected for the given parameter.
:return: description is for specifying a description of the value returned.
:rtype: description allows you to explain the type of value returned
:raises Exception: description allows you to describe when a specific exception is returned.
With these new definitions in mind, we can add some details about our multiply function. Its docstring will look like this.
defmultiply(a, b):
"""Multiplies two integers
The first number does not have constraints, but the second number
cannot be negative. Doing otherwise leads to unexpected behaviour.
:param a: First number
:type a: integer
:param b: Second number
:type b: positive integer
:returns: Multiplication of a and b
:rtype: integer"""
# If any of the numbers is zero, result will be zero
if a == 0or b == 0:
return0
# Define a variable to store the result temporarily
res = 0
# Sum the a to the temporary result b times
for i inrange(b):
# Update the temporary result
res += a
return res
Sphinx
The Sphinx official logo.
Awesome, now we know how to use RST in our documentation. We also know about the beauty of RST, which can render our docstrings into beautiful HTML where we actually see the text bold, not included in stars. Sphinx is the tool that does that – in fact, it does even more than that.
Sphinx reads your Python code and creates a set of static web pages containing all the documentation. It understands RST.
Using Sphinx is a pillar of python documentation, and being a complex tool we cannot cover everything about it in this article. However, we can get you going with it. If you wish to read more, you should take a look at the official Sphinx website.
Getting your Sphinx Up and Running
To use Sphinx in our Python Documentation, we need to install it. We can simply use pip for that, as any other Python module.
pip install Sphinx
Now, navigate in your project folder and launch the Sphinx setup. This will create several folders that will hold the documentation.
sphinx-quickstart
It will ask you several questions, but the setup is guided and extremely easy. You can leave everything to the default value, but be sure to use the autodoc module (by default, it won’t use it). You can change settings later, but it is a real pain.
At this point, open the generated conf.py file and after the first line (#!/usr/bin/env python3) add the import of your project. To do that, you need to specify the project folder, in this case, it is . because the project is in the same folder as Sphinx. For larger projects, you should have two separate folders for readability (e.g. sphinx and source).
import sys
sys.path.insert(0, ".")
Adding modules to Python Documentation
When we launched the Sphinx setup, it created several files. One of them is index.rst, an index file for your documentation. Guess what, it is written in RST. Here we can start adding the modules we want to include in our documentation with the automodule keyword and the classes with the autoclass keyword. So, open the file and add the following after :caption: Contents:.
.. automodule:: mymodule
:members:
Of course, you need to use the name of your own module. This will look at the module and obtain its documentation. Without the :members: option, it will only obtain the docstring of the module. However, by requiring the members, it will recursively search for its classes and their methods.
Building the Python Documentation
Once we want to finalize the static web pages with our documentation, we can run a build. We can do this as many times as we would like. Every time, it will take the documentation from the source code and create new pages, overriding the old ones. To run a build, you can run this code.
sphinx-build -b html
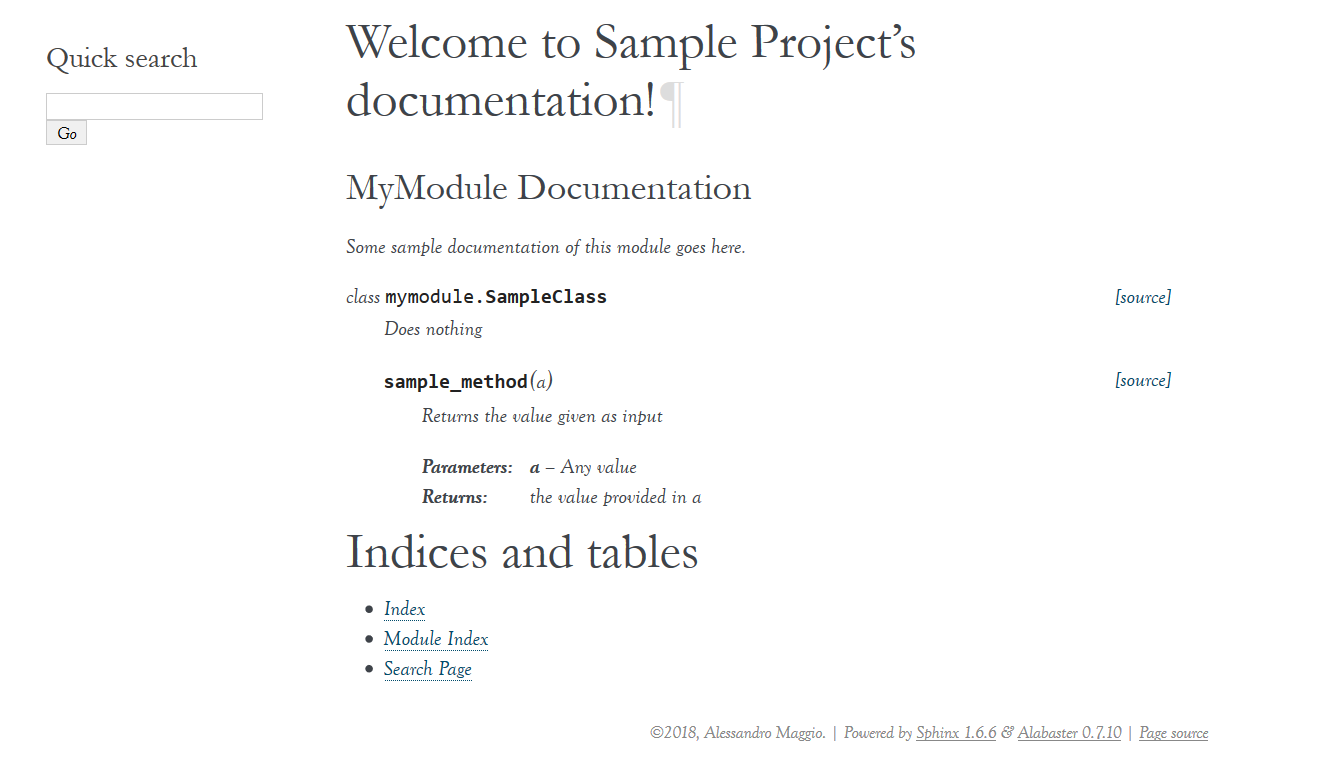
Instead of and , we obviously need to place where the source code is and where we want our documentation to be as output. After the build, you can open the index.html file in your build directory in a browser. Our looks something like this.
The homepage of our documentation for a sample module.
Modern programming necessitates the use of documentation. It is not an option that can be added afterwards. As a result, you should write it alongside your code. If you don’t, you will wind up with too much documentation left behind, and sooner or later your code will collapse. We term this technical debt.
All experts recognize the harmful effect technical debt may have on their work, therefore they prevent it using documentation. Now, you know how to create Python Documentation like a professional. Even if you are relatively new to the language, you know the foundations of producing effective code. Teach yourself to produce documentation even in the scripts you develop for testing and learning, you will soon be a professional.
Now, it is time for you to discover all the deliciousness of documentation. Let me know what you think about it, about Sphinx and about RST. And, of course, let me know if you desire to know more about these issues! What are your thoughts? Just put them in the comments.
If Our Method Resolve Your Problem Consider To Share This Post, You can help more People Facing This Problem and also, if you want, you can Subscribe at Our Youtube Channel as Well!
https://www.techguruhub.net/best-approaches-python-document/?feed_id=172296&_unique_id=64a461fea458b
OSPF is amazing and funzional in enterprise networks. The OSPF interior routing protocol is very common. OSPF performs an excellent job of estimating cost values in order to choose the shortest path to its destinations first. The three types of Open Shortest Path First activities are as follows:
Neighbor and adjacency initialization
LSA flooding
SPF tree calculation
We'll go through the fundamentals of Open Shortest Path First, as well as its functionality and setup, in this report.
ON THIS PAGE: Getting Started with Open Shortest Path First (OSPF)
Initialization of neighbours and adjacencies
Flooding and State Advertisements
The fundamentals of Open Shortest Path First configuration
Initialization of neighbours and adjacencies[ps2id id='Initialization of neighbours and adjacencies' target=''/]
This is the very first step in the Open Shortest Path First method. This role, as well as the ma...
Subnetting and subnet mask creation are often outsourced to consultants, although doing it yourself may be both difficult and lucrative.
If you work for a large company or organisation, particularly one with more than two locations, there's a good chance you're benefiting from a process known as subnetting.
Subnetting, also known as subnetworking, allows big and unmanageable networks to be broken down into smaller, more localised networks by breaking the main networks into two or more strands. with this method i will show you, you don't need an subnetting calculator.
ON THIS PAGE: Subnetting fundamentals: What is a Subnet?
Let's start with IP addresses.
What is the purpose of subnetting?
What is the topology of a network?
What is the definition of a default gateway?
Implementation and Guide to IPv6
What is a subnet?
Subnet masks are crucial.
Why is it necessary to subnet?
But don't begi...
The healthcare industry has been a primary target for cybercriminals, especially during the COVID-19 pandemic. The rise of ransomware attacks has put the lives of patients at risk and caused significant financial losses for healthcare organizations. In response, Microsoft has taken the lead in a global crackdown against Cobalt Strike, a tool widely used by hackers to launch ransomware attacks. This move by Microsoft is a significant step towards safeguarding the healthcare industry and protecting patients' data from cyber threats. In this article, we will explore the impact of ransomware attacks on healthcare organizations and how Microsoft's initiative can help mitigate the risks. Executive Summary Microsoft, the Health Information Sharing and Analysis Center (Health-ISAC) and other partners have announced a widespread technical and legal crackdown against servers hosting “cracked” copies of Cobalt Strike; a tool commonly deployed by cyber criminals to distribute malware, in...
 Have you ever experienced frustration because of the code you wrote? If you have been writing code for a while now, you probably had. And, if not, you certainly will. Sometimes we just keep staring at the code, trying to figure out what it does and why. When we wrote the code, everything was clear, but after a few weeks or months, it looks fuzzy. We can prevent this bad situation simply by writing Python Documentation. In this article, we are going to see how you can use python documentation best practices. These will make your code far more readable and maintainable.


 If Our Method Resolve Your Problem Consider To Share This Post, You can help more People Facing This Problem and also, if you want, you can Subscribe at Our Youtube Channel as Well!
https://www.techguruhub.net/best-approaches-python-document/?feed_id=172296&_unique_id=64a461fea458b
If Our Method Resolve Your Problem Consider To Share This Post, You can help more People Facing This Problem and also, if you want, you can Subscribe at Our Youtube Channel as Well!
https://www.techguruhub.net/best-approaches-python-document/?feed_id=172296&_unique_id=64a461fea458b


Comments
Post a Comment