Creating and Testing SDN Software with GNS3
 Software-Defined The future of network engineering is being shaped by networking. As a result, everyone in this business will need to grasp how to deal with it. SDN transforms the network into a straightforward service for the application. Any application may need network modifications and evolution, necessitating the creation of progressively complex architectures by engineers. This necessitates the use of SDN software. However, in this article, we will demonstrate how to test the functionality of any SDN software for free. GNS3, a fantastic network simulator, will be used to demonstrate how to test SDN applications. This is helpful if you also want to build software.
Table of Contents about Creating and Testing SDN Software with GNS3
Here’s what we are going to cover today:- Why test SDN software?
- Preparing your PC for connecting to GNS3
- Bridging our PC (and the SDN software) to GNS3
- Some common problems
- Conclusion
Why test SDN software?[ps2id id='Why test SDN software?' target=''/]
 In the development sector, it is said that anything that hasn't been tested doesn't function. Indeed, we may use this concept here. SDN software will be able to better administer your whole network than a human administrator. All of this authority must be backed up by some kind of accountability. To put it another way, we must ensure that everything works well. If that's the case, shooting with your foot isn't the same thing. It's almost as if your foot was nuked.
Something that hasn't been tested will not function.
As a result, this article will go through how to configure SDN in a virtual environment. We'll demonstrate how to attach SDN software to virtual devices in such a way that we can even blow them up without causing any damage to the network!
In the development sector, it is said that anything that hasn't been tested doesn't function. Indeed, we may use this concept here. SDN software will be able to better administer your whole network than a human administrator. All of this authority must be backed up by some kind of accountability. To put it another way, we must ensure that everything works well. If that's the case, shooting with your foot isn't the same thing. It's almost as if your foot was nuked.
Something that hasn't been tested will not function.
As a result, this article will go through how to configure SDN in a virtual environment. We'll demonstrate how to attach SDN software to virtual devices in such a way that we can even blow them up without causing any damage to the network!
Who should read this article?
This article is suggested for every network engineer who wants to hop on the SDN bandwagon; nevertheless, some of us will profit more than others. If you're working on a Proof of Concept for SDN software, this article will come in handy. Alternatively, if you're trying to create SDN software, this will be great. You may have heard about our noble endeavor: a set of tutorials teaching how to build SDN software in Python from the bottom up. You should also check at the project's beginnings and our GitHub repository.What about GNS3?
GNS3 is a network simulator that lets you imitate a wide range of network devices on your PC. Connecting Cisco, Juniper, Fortigate, and Palo Alto, among others, to VirtualBox allows you to execute them. GNS3 enables you to connect your laptop to a business-grade network. The fact that it is fully free and open-source is what sets it apart. Navigate to the download page. As a consequence, our purpose here is simple. We want to install the SDN software on our computer and link it to our GNS3 virtual network. This helps us to determine if it is operating as planned. Don't worry if you possess an SDN appliance (that is, a specialized operating system designed specifically for SDN). It may also be run on a virtual machine and linked to GNS3.
Read More: How to Resolve Sound Problems in Windows 11 (More Than 15+ Ways!)
Preparing your PC for connecting to GNS3[ps2id id='Preparing your PC for connecting to GNS3' target=''/]
After connecting GNS3 to your PC, your applications will be able to interact with and via the GNS3 network. GNS3 is, after all, hosted on your computer. This wonderful feature enables you to install SDN software on your PC and link it to the network. To do so, we'll need to set up a virtual network interface on your computer that can connect with GNS3. Consider if your computer will be linked to the Internet by cable or wireless. This is a real thing. We'll build a simulated one that connects to the GNS3 network. This is simple to perform on both Windows and Linux.The Microsoft Loopback
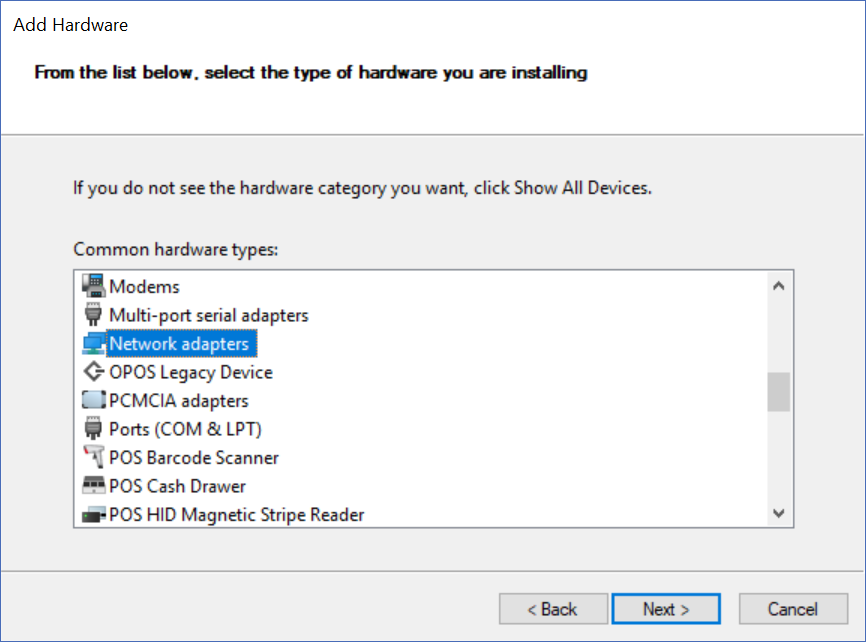
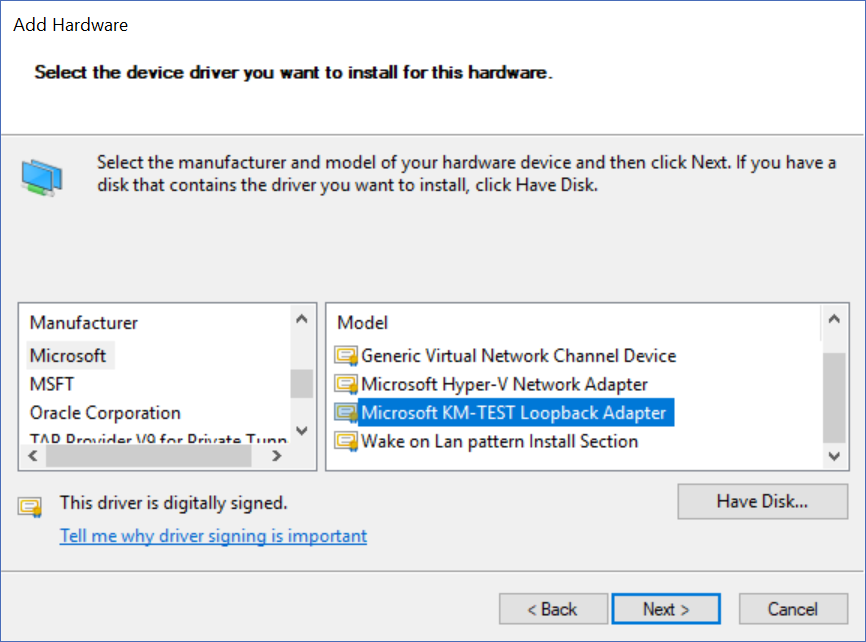
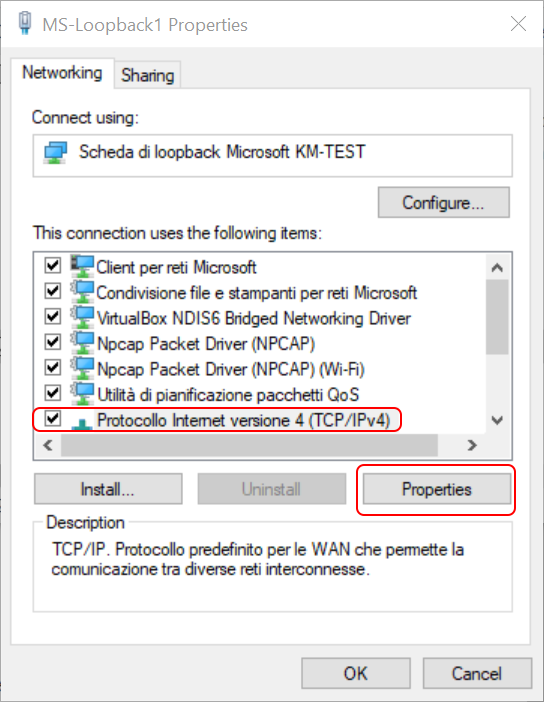
The MS-Loopback interface is a loopback interface that is utilized by Windows. This is a virtual interface that enables programs to interact with one another, which is precisely what we are looking for. You already have the software on your computer to create this interface; all you need to do now is put it into action. As a consequence, launch the command prompt as an administrator (important!). Then, execute the following command. hdwwiz.exe This will open a new window where you may install older devices. Our MS-Loopback is really rather old. Simply click the next button in this box, and then choose Advanced mode on the next screen.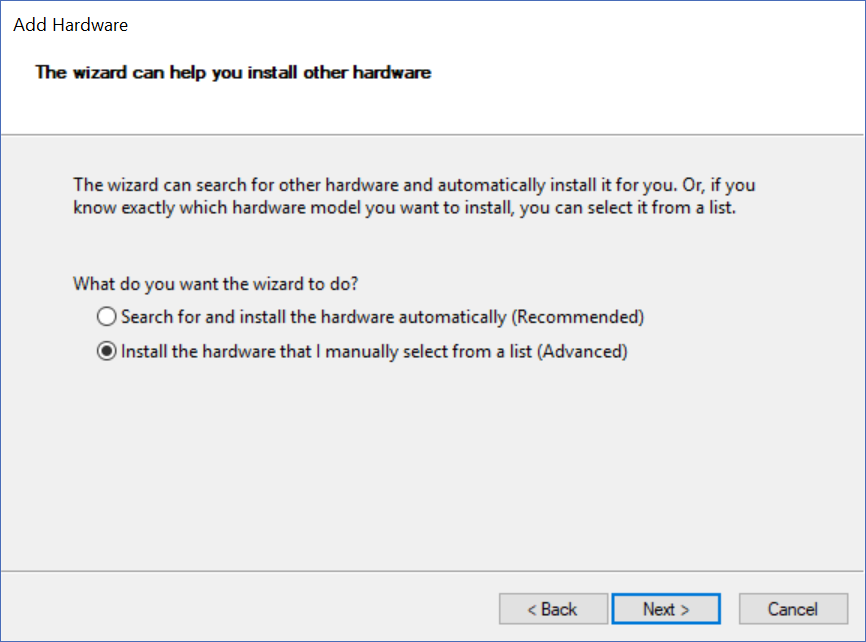
Tuning our MS-Loopback interface
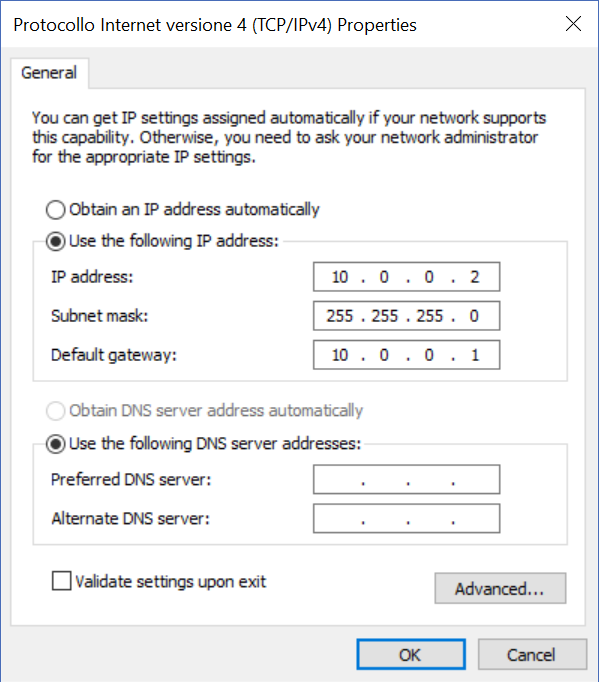
Once you install the loopback interface, it will be a network card like all the others. However, we need to assign an IP to it. Since our PC is a home PC and typically works in the192.168.1.0/24 network, we can use addressing from the 10.0.0.0/8 range. In our case, this will avoid any problems, but you need to check your network settings to be sure.
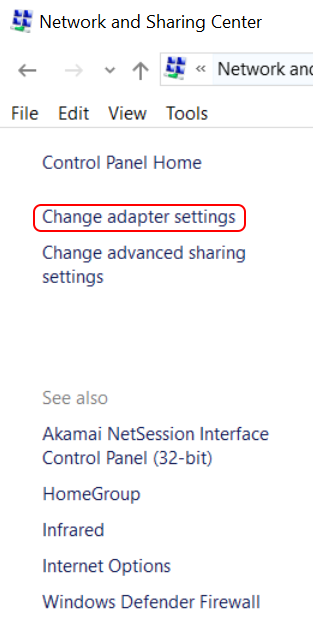
To change the settings, open the Control Panel and navigate to Network and Internet > Network and Sharing Center. From there, on the left column select Change adapter settings.
Adding a loopback interface on Linux
Adding a loopback interface to Linux is a piece of cake. You don't need to perform any of the complex things that Windows demands; just issue a command. Open your command prompt and use ifconfig to verify the existing interfaces. You'll see a single loopback interface called lo. We don't want to mess with it, so we use this command to create a new one.sudo ifconfig lo:1 10.0.0.2 netmask 255.255.255.0 up
lo:1 already exists, you can create lo:2 or any other number.
IP address considerations
When configuring the loopback interface, you need to specify a valid address. This must be an address that fits in the GNS3 topology, and that the devices in GNS3 will understand. If you are following this tutorial, you are likely to know to plan this correctly. Later, we are going to add a virtual router in GNS3 with the address10.0.0.1. The two will be able to communicate with each other if we connect this router straight to our PC in GNS3. It will not function if you use an IP address that GNS3 does not recognize because you have not set the necessary routing. The traffic will arrive at GNS3, but it will be lost there.
Bridging our PC (and the SDN software) to GNS3[ps2id id='Bridging our PC (and the SDN software) to GNS3' target=''/]
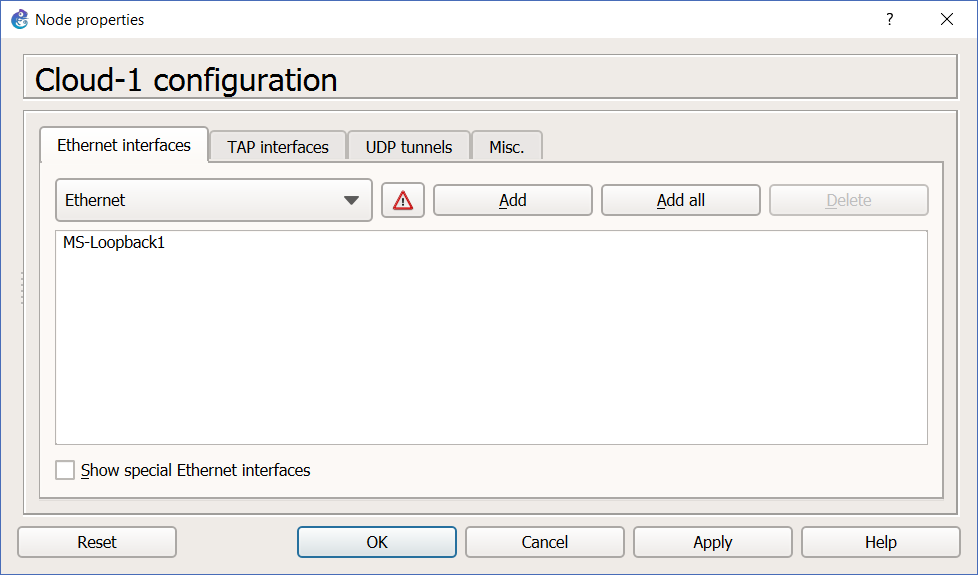
Now that the PC is ready, we need to tell GNS3 to talk with it. If we do that, we can then use our SDN software on the enterprise network. To do that, open GNS3 and from the list of all devices add a cloud to the network.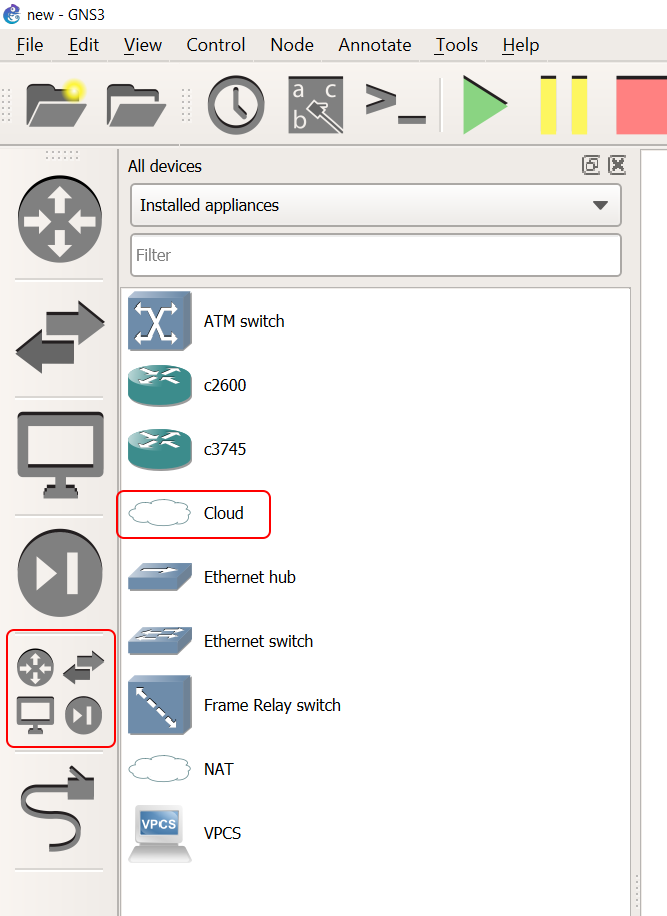
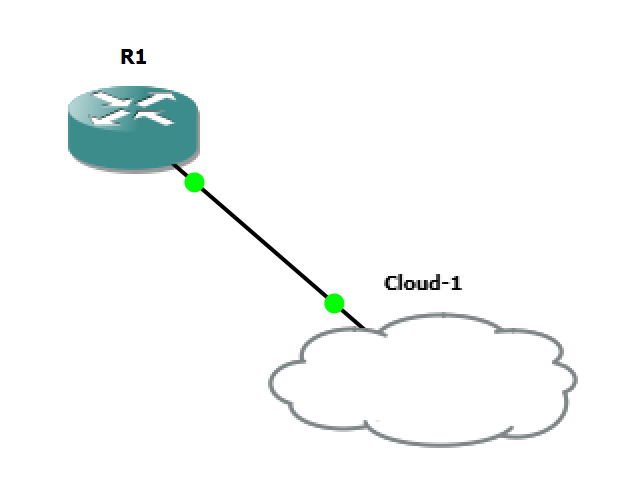
Configuring the router
We started this article with a simple statement.If it is not tested, it doesn’t work.Now we can honor this statement by testing what we did. We need to configure the router with some sample settings so that we can see if it can ping our PC, and vice versa. Furthermore, we are going to see if we can launch a telnet connection. Since we used the interface FastEthernet 0/0, we can give the following commands to our Cisco router.
username admin privilege 15 password cisco
enable secret cisco
banner motd ^SDN Testing router^
!
interface FastEthernet 0/0
ip address 10.0.0.1 255.255.255.0
no shutdown
exit
!
line vty 0 15
transport input all
login local
end
!
Type escape sequence to abort.
Sending 5, 100-byte ICMP Echos to 10.0.0.2, timeout is 2 seconds:
.!!!!
Success rate is 80 percent (4/5), round-trip min/avg/max = 8/9/12 ms
C:\Users\aless>telnet 10.0.0.1
SDN Testing router
User Access Verification
Username: admin
Password:
R1#
Some common problems[ps2id id='Some common problems' target=''/]
Connecting your PC to GNS3 might be difficult. When you do everything perfectly, it doesn't always work. If you're like me and require this arrangement to create SDN software, you'll have to work around it. I discovered that using Dynamips routers instead of the GNS3 VM is the best way. I've also discovered that the GNS3 VM may sometimes screw up the configuration. Don't be alarmed if this is your situation and you are certain that everything is in order. Try reinstalling GNS3, and believe me, it is a lifesaver. It may get buggy at times, and you may need to do so. Don't waste time debugging something that should already be functioning.A bonus tip on the routing
In this setup, our PC knows that everything about 10.0.0.0/24 is on GNS3. It doesn’t know anything else, and if we want to add other routers behind R1 we can’t reach them from our PC. This is because routes are missing. We can simply fix it by adding a route. On Microsoft this is simple, you can use theroute add command.
route add 10.0.0.0 mask 255.0.0.0 10.0.0.1
10.0.0.0/8 subnet is behind 10.0.0.1, our GNS3 router.
Read More: How to Resolve Sound Problems in Windows 11 (More Than 15+ Ways!)
Conclusion[ps2id id='Conclusion' target=''/]
Connecting your PC to GNS3 significantly speeds up network testing. Working in SDN may have a significant impact on how you perform. This presentation will show you how to utilize your tools in in-network labs. Everything may be done on your laptop without the need for additional equipment. How do you feel about this procedure? Was it immediately effective? How do you intend to use GNS3's host connection in your laboratories? Please, as usual, offer your thoughts in the comments section! If Our Method Resolve Your Problem Consider To Share This Post, You can help more People Facing This Problem and also, if you want, you can Subscribe at Our Youtube Channel as Well!
https://www.techguruhub.net/2022/07/16/creating-testing-sdn-software-gns3/?feed_id=98816&_unique_id=62d2c38b2907c
If Our Method Resolve Your Problem Consider To Share This Post, You can help more People Facing This Problem and also, if you want, you can Subscribe at Our Youtube Channel as Well!
https://www.techguruhub.net/2022/07/16/creating-testing-sdn-software-gns3/?feed_id=98816&_unique_id=62d2c38b2907c


Comments
Post a Comment