Your #1 Tech Website Resource for your IT Certification! Daily Technology News, Tutorial and More!
We’re dedicated to giving you the very best of It Cert, with a focus also on Cisco/huawei certs, security and IoT and Lab
VISIT MY WEBSITE:
https://www.techguruhub.net
How you can resolve activation error with 0xC004F211 on Windows 10
How you can resolve activation error with 0xC004F211 on Windows 10[ps2id id='How you can resolve activation error with 0xC004F211 on Windows 10' target=''/]
What occurred if you had a Windows 10 activation problem with 0xC004F211? If you're encountering this error number, it's likely that you've changed some hardware in your PC, such as an HDD/SSD or motherboard...
So, what can you do to remedy it? As long as your PC was bought from OEM (Original Equipment Manufacturer) or you have a valid Windows product key, you may re-activate your PC by following the instructions below:
Press Windows key + I go to Settings
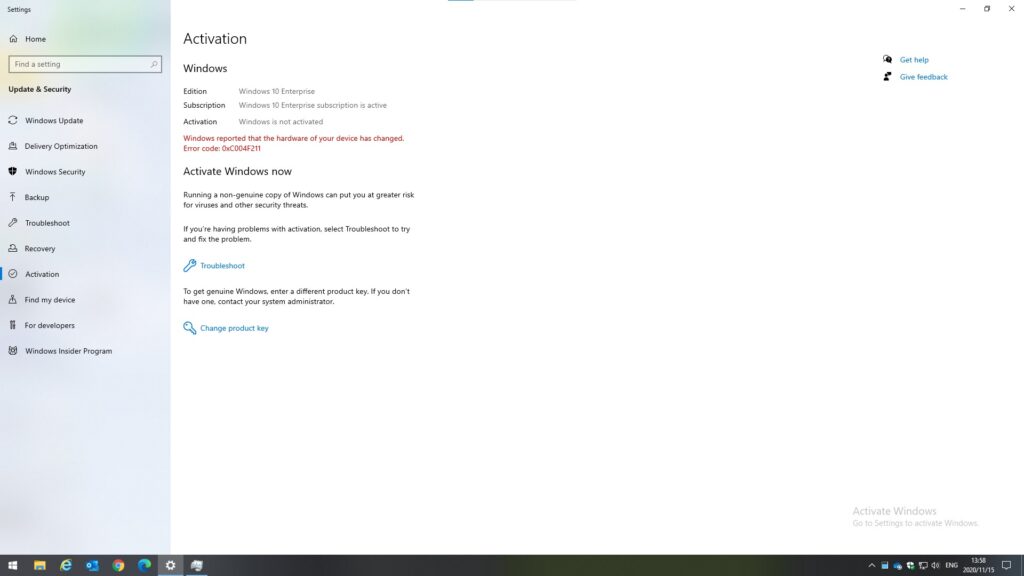
2. Click “Windows isn’t activated. Activate Windows now.” Or go to Updates & Security > Activation.
3. Find the Certificate of Authenticity (COA) on your PC (if current PC was preinstalled with Win7 or earlier version) or from your email if you buy from the online store.
4. Click “Change product key” on the activation page and enter your product key > hit “Next” button.
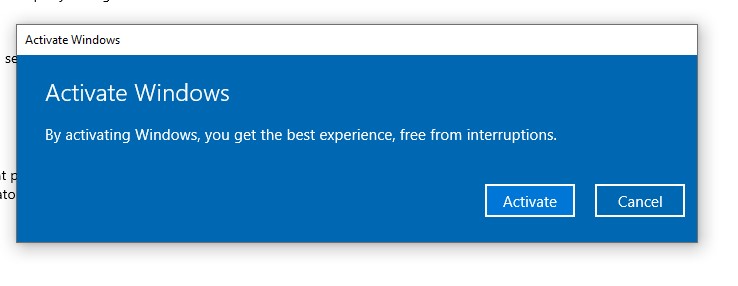
5. When prompt with the following windows then you hit “Activate” button.
6. Once completed it will shows “Windows is activated” with watermark disappear.
In addition, if you encountered another activation code beginning with "0x803f7001" or "0x800704CF," you may re-activate using the methods outlined above. These two error codes are most often seen when installing Windows 10 with an E3 or E5 license on a PC that came pre-installed with Windows 7 Pro.
For your convenience, here are some more activation error codes for Windows 10 with solutions:
0xC004F212 – The product key used on this device didn’t work with this edition of Windows. You might need to get in touch with the store or company you bought Windows from, enter a different product key, or go to the Store to buy genuine Windows.
0xC004F213 – Windows reported that no product key was found on your device.
“Your Windows License Will Expire Soon” – This may occur if you have a volume license client installed. Mostly this happened on machine in large organization that have a volume licensing agreement with KMS.
0xC004C003 – Your Windows 10 key isn’t valid or has been used on multiple device.
0xC004F034 – You may entered an invalid product key or a product key that used for a different version of Windows.
0xC004F210 – You entered a product key for a different edition of Windows that the edition installed on your device.
0xC004E016, 0xC004F210 – You may entered a product key for a different version or edition of Windows.
0xC004FC03 – You see this error means you may having internet connection issue or there is a firewall rule that preventing Windows from completing the activation process.
0xC004E028 – The activation already in the process and your device should be activated after the first request is completed.
0X8007267C – Your device may not connect to the internet or your firewall may blocked activation request.
0xD0000272, 0xC0000272,
0xC004C012, 0xC004C013,
0xC004C014 – The activation server is temporarily unavailable and your Windows will automatically be activated when the service comes back online.
0xC004C008, 0xC004C770,
0x803FA071 – The product key has been used on another device or it is being used multiple times than Microsoft Software License Terms allow.
0xC004F00F – You using a product key to activation with different version of Windows. (e.g. using product key for Windows 10 Pro on Windows 10 Home machine)
0xC004C020 – The product key was with Volume License and has been exceed the number of device that it can activate in organization environment.
Windows 10
FIX: Error 0x800f0922 in KB5007186 Windows 10 Update (Solved)[ps2id id='FIX: Error 0x800f0922 in KB5007186 Windows 10 Update (Solved)' target=''/]
If the Windows 10 KB5007186 Update fails to install with error 0x800f0922, follow the steps below to resolve the issue. Here You Descover How you can resolve activation error with 0xC004F211 on Windows 10
Detailing the issue: After downloading the KB5007186 Update, Windows 10 will request you to restart your computer to install it. However, upon restart, Windows 10 warns you that "We were unable to finish the upgrades. Reversing modifications "and show the following error message in Windows Update: "Update KB5007186 – 0x800f0922 failed to install"
This tutorial contains several methods to fix the Windows 10 Update error 0x800f0922.
How to FIX 0x800f0922 Update Error in Windows 10.[ps2id id='How to FIX 0x800f0922 Update Error in Windows 10.' target=''/]
Important: Before installing proceeding to the methods below, perform the following actions:
Ensure that you have enough free space on your disk. Windows 10 requires at least 32 GB of free space to upgrade.
Run Disk Cleanup and delete all the useless files.
Download and install the latest Servicing Stack update according your Windows 10 version.
Method 1. Re-Download the Windows Update(s).[ps2id id='Method 1. Re-Download the Windows Update(s).' target=''/]
The first step to troubleshoot Windows 10 update problems, is to force Windows to download the updates from scratch. To do that:
Step 1: STOP the Windows Update Service.
1. Open Windows Services control panel: To do that:
Press Windows + R keys to open the run command box.
In the Search box, type: services.msc & click OK.
2. In Services control panel locate the "Windows Update" service.
3. Right-click on Windows Update service and select "Stop".
Step 2: Delete the SoftwareDistribution folder.
1. Open Windows Explorer and navigate to: C:\Windows folder.
2. Find and Delete the "SoftwareDistribution" folder (or rename it. e.g. to "SoftwareDistributionOLD") . *
* Note: If you cannot delete the folder, start Windows in Safe Mode.
Step 3: START the Windows Update Service.
1. Open Windows Services control panel.
2. Right-click on Windows Update service and select "Start".
Step 4. Check & Install Updates.
1. Finally, go to Settings -> Update and Security -> and click Check for Updates.
Method 2. Fix 0x800f0922 error by Installing Microsoft Edge.[ps2id id='Method 2. Fix 0x800f0922 error by Installing Microsoft Edge.' target=''/]
On machines that have had Microsoft Edge uninstalled, the error 800f0922 in the Windows 10 upgrade may occur. So, if you already removed Edge from your computer, do one of the following:
A. Re-install Microsoft Edge browser on your computer and try to install the update again.
B. Proceed to delete the "Edge" folder at this location on your disk before installing the failed update:
C:\Program Files (x86)\Microsoft\Edge
Method 3. Fix Error 0x800f0922 by Activating .NET Framework.[ps2id id='Method 3. Fix Error 0x800f0922 by Activating .NET Framework.' target=''/]
1. Launch Programs and features. To do that
Press Windows + R keys to open the run command box.
In the Search box, type: appwiz.cpl & click OK.
2. Click Turn Windows features on or off.
3. Check the .Net Framework 3.5 and click OK.
4. Then select Download Files from Windows update.
5. Let Windows to download and install Net Framework 3.5. *
* Note: If you cannot install Framework 3.5 by using the above steps, then follow the instructions in this tutorial: FIX: Net Framework 3.5 0x800f081f Installation Error.
6. After Framework installation restart your computer.
7. Try to update Windows again.
Method 4. Install Windows Update Manually.[ps2id id='Method 4. Install Windows Update Manually.' target=''/]
1. Navigate to Microsoft Update Catalog.
2. On the search box type the number of the failed update (e.g. "5007186") and click Search.
3. Now according your Windows version, download the corresponding update.
4. When the download is completed, double-click at the downloaded file to install the update.
Method 5. Repair Windows Component Store & System Files.
1. Open Command Prompt as Administrator.
2. In command prompt give the following command and press Enter:
3. When the process is completed, give the following command:
DISM.exe /Online /Cleanup-image /Restorehealth
4. When the DISM operation is completed, type the following command and hit Enter:
sfc /scannow
5. Now wait until the System File Checker repairs the Windows System Files.
6. When this done, restart your computer and try to install the update.
Method 5. Update Windows 10 by using the Update Assistant.[ps2id id='Method 5. Update Windows 10 by using the Update Assistant.' target=''/]
1. Navigate to Windows 10 download site and click the Update now button.
2. Save the "Windows10Upgrade9252.exe" file on your desktop.
3. Double click at the downloaded file to open the Windows Upgrade Assistant.
4. Click Update Now to start the update.
5. Let Windows to finish the downloading and the verification.
6. When the verification is reaches 100%, disconnect your computer from the Internet, (or set it to "Airplane mode" if you own a laptop).
7. Wait until Windows updating your system.
8. When prompted, restart your system to install the update.
That's all folks! Did it work for you? Please leave a comment in the comment section below or even better: like and share this blog post in the social networks to help spread the word about this solution.
If Our Method Resolve Your Problem Consider To Share This Post, You can help more People Facing This Problem and also, if you want, you can Subscribe at Our Youtube Channel as Well!
Need to a dedicated hosting for wordpress? If you need to create a website fast, WordPress is one of the most popular and adaptable content management systems.
These best hosting providers provide you with the resources you need to build a strong site using the popular CMS plus compare the pricing, features, performance, and support of WordPress hosting providers to determine which is best for you or your company.
We know this, an hosting for wordpress are precious for our business. Most individuals who have used a content management system will claim they've used WordPress. For the greater part of two decades, open-source software has powered a wide range of websites, from major media brands like Rolling Stone to one-person blogging operations. The accurancy of choose a perfect wordpress website hosting it's a Pro move.
Customers like WordPress because it allows them to create a professional bespoke website utilizing a choice of themes, plug-ins, a


 + R keys to open the run command box.


![image_thumb[6]](https://www.repairwin.com/wp-content/uploads/2019/11/image_thumb6_thumb.png "image_thumb[6]")


Comments
Post a Comment